The Assault is one of the more dynamic classes in Monday Night Combat, able to adapt to many game situations to apply his talents where his team needs them. Playing as an Assault often requires changing tactics mid game, eschewing killing enemy Pros in order to defeat a Jackbot XL or push a Bot lane.
General[]
Player control[]
The Assault is reasonably strong at keeping enemy players under control, although this mostly centers around disruption more than outright elimination. Once he has his Bomb at level 3, he can control wide areas of space to keep players out of their ideal spots (especially Snipers on their high perches). Unfortunately, it is rare for the Assault to single-handedly take out enemy players without spending a lot of effort chasing down that individual player. He doesn't have the tools to get in close for lethal gunfights like the Gunner and Support. He can't one-shot kill like the Sniper and Assassin (save for a ringout). Fortunately, the Assault is rarely alone in MNC. Either he's starting the attack that someone else can finish or he's finishing someone else's assault.
Bot control[]
Assault is not very strong at handling bots. His grenade launcher can do ok at damaging them, but he doesn't take them out nearly as easily as the Assassin or Tank. His level 2 Charge is good for eliminating Gremlins, level 3 for Bouncers. The Jackbot will take a long time for the Assault to eliminate.
Turret destruction[]
Assault is probably only better than the Sniper at destroying turrets. Even juiced, the Sniper has some trouble taking turrets, and it's effectively impossible with a Support on them. For the Assault, he can reasonably outrace a Support actively healing a turret with a high enough rate of fire while juiced, but never without juice. The Bomb doesn't do all that much, either.
Maneuverability[]
Two of the Assault's greatest assets are his good speed and Fly ability. Clever use of flying and Charge allow the Assault to be among the first combatants on the field of a Crossfire match, and an Assault player should take advantage of this to secure the most powerful position he can. High speed also allows the Assault to move between arena sides quickly in order to respond to new threats.
One way to quickly get to places at the cost of health is to lay a Bomb at your feet then run and jump at the edge of the blast radius. Once at a good distance and height Fly and Charge and right before the charge ends stop flying. You will keep the momentum and continue foward. NOTE this will cost you some skill recharge time and health so make sure to use this wisely.
Flying[]
Unlike the Tank and Gunner's jet packs, Assault's Fly cannot be used to climb altitude, leaving it up to the player to find other ways to gain higher ground.
- Knock-back effects from explosions, grapples, and other skills like the Gunner's Slam can launch you into the air. Activating the jet pack will let you hover at whatever height you were launched to.
- Jump Pads send the player very high en route to the pad's destination. Press the Fly button at any time to interrupt the normal "jump" and hover to your own target. Sending grenades and bombs towards the ground may surprise and confuse enemy Pros.
Flying has other strategic uses besides maneuverability:
- Fly can be used to slow or stop your momentum after being thrown, saving you from many potential Ring Outs. It can also be used to avoid a Sniper's Traps.
- An Assault who is flying cannot be grappled by another player, even if the Assault is hovering barely off the ground. This gives the Assault a significant tactical advantage when engaging Assassins, Snipers, and other Assaults (with level 3 Charge) at close range.
- When facing other pros, jumping and using Fly at different heights can be effective at throwing off your opponent's aim.
- Assaults can attack positions that would otherwise be locked down for other classes by flying around obstacles to attack from unprotected sides. This is especially prevalent on the sides of AmmoMule Arena and the edges of the "ring" on GrenADE III Arena.
- Remember that although flying has its benefits, it also has its drawbacks. Make sure you keep and eye on your fuel meter, as you do not want to run out right above a group of enemies. Also, you are less accurate while flying, so it can be harder to do as much damage as on the ground.
Game modes[]
Blitz[]
Crossfire[]
Early game[]
Use your speed and maneuverability to get to the best map positions as early as possible, before Gunners have time to set up or Snipers have time to prepare a shot. Flying and Charging can get you places that other pros can't reach without activating Jump Pads or going for a long walk. Harass enemy bots with your Grenade Launcher as soon as they are in range, and use your Bomb defensively to protect you from Assassins; an Assault's default armor is enough to survive a Dagger front-grapple, and with a gold armor endorsement survive even a back-grapple, making an entrenched Assault player a target to avoid for most Assassins in the early game.
High ground makes it hard for others to target you and draws their eyes away from ground level, allowing your slower teammates to bring pressure from below. Pester pros with the Assault Rifle to distract them and perhaps goad a rash player into charging your Bomb-protected position.
Early game skill upgrades are up to personal preference and map specifics. Defensive players use early Bomb upgrades for greater damage, explosion radius, and more frequent use. Passive Assault skill gives Critical Shot boosts which are important for run-and-gun Assault Rifle users. Mobile players will want to upgrade Fly to improve their ability to maneuver around the arena. And aggressive players will want to get Charge to level 3 quickly; its grapple makes you a terror up close, especially in narrow passageways where it's hard for enemies to avoid it.
Mid game[]
An Assault player should be influencing every area of the arena by mid game, using his Grenade Launcher to push his bots forward and destroy enemy turrets, and switching to the Assault Rifle to engage Pros at medium range. Level 3 Bombs can cripple entire groups of Black Jacks and make an excellent goal-line defense against encroaching bots. Level 3 Charge can outright kill many players and will send many more off the map for a Ring Out.
The Assault is a good choice to engage an enemy Jackbot XL, since a Bomb "stuck" to the Jackbot does very good damage, and the Assault's speed lets him continually pester the bot with grenades without taking damage from the Jackbot's weapons. Use Fly to hover over a "slam" attack when getting close enough to stick a Bomb. An Assault won't be able to drop a Jackbot as quickly as some other classes, but is better than most at delaying and steadily destroying the behemoth.
Attacking a Money Ball[]
Other classes will do more damage when rushing the enemy Money Ball, but an Assault can still do solid work with a Grenade Launcher and Bomb use. Bombarding the Money Ball from a secluded corner of the arena is highly effective, as many players won't notice where your small grenades are coming from over the chaos of your team's attack. A smart Assault can use this technique to prevent the Money Ball's shields from coming back online after his teammates have been defeated, giving the team an opportunity to resume the attack before shields can be restored.
If involved in a close-range fray around the Money Ball, an Assault can use his Bomb to either deal solid damage to the Money Ball or kill defending Pros. The Assault is indeed particularly good at picking off defenders with level 3 Charges, Bombs, and Assault Rifle barrages.
Defending the Money Ball[]
Assaults can be hit-or-miss when defending a Money Ball. Throwing a Bomb on your own Ball can be a good defensive tactic, since many players will run very tight circles around a Money Ball when attacking it; blowing the Bomb while enemies are close to the Ball will clear them out and kill many. Charge can also pick off individual targets, but will probably cause the Assault to take a lot of damage from enemy cross fire during the grapple animation. Charging can be especially useful against Juiced targets: the attack won't kill them, but will send them flying away from the Money Ball, along with keeping them grappled during some of their Juiced duration.
Large groups of Bots can be handled with Grenade Launcher grapples, Bombs, and Charges; see Assault vs. Bots under "Black Jack" for more strategies. However, an Assault whose abilities are on cool down will struggle to stop even a single Black Jack from attacking his Money Ball, as it simply takes too many grenades to kill an individual Black Jack if the Bot is already inside your base.
Weapons[]
Assault Rifle[]
The Assault Rifle ("AR") is most effective at medium range, and can down an enemy pro before they can push to close-weapon range. With the Assault's speed and maneuverability, a Tank or Support caught in the open will be hard-pressed to gain enough ground to threaten the Assault player. On the other hand, the rifle is surprisingly ineffective past medium range, when the weapon's spread makes it unlikely that enough shots will land to seriously threaten a target. Additionally, the rifle suffers from reduced damage at long range, so besides hitting enemies fewer times at range, an Assault will also be doing less damage with each shot.
An Accuracy Endorsement will greatly tighten the rifle's natural spread, making it more effective at longer ranges -- though it will still suffer from damage decay -- and a virtual buzz saw at close range.
The AR can be used effectively against Gremlins, Slims, and Buzzers, but should only be used against larger bots in a pinch.
Grenade Launcher[]
The Grenade Launcher makes an arguably more effective long-range weapon than the Assault Rifle due to the rifle's damage decay over large distances. Despite being much harder to hit a moving Pro with a grenade than the rifle, it is also much harder for a Pro to shrug off the damage of a grenade than to ignore the pelting of a few rifle bullets. Grenades are especially useful against deployed Gunners and Tanks, who otherwise laugh at an Assault's attempts to dislodge them.
Making the most of the Grenade Launcher requires taking advantage of its ricochet rounds and detonation radius. There are important sections of every Arena where strong positions are protected by unbreakable glass or large walls, and an Assault excels at driving opponents from those positions with his Grenade Launcher. Bouncing grenades into protected areas will surprise many defending players and -- if they don't know where the Assault is -- many will panic at taking damage while in their "fortress", leading to easy withdrawals. See Assault Arena strategy for specifics.
A second important technique with the launcher is "skipping" grenades across the ground to hit opponents in the open. Rather than go for a direct hit against a small enemy target, aim low with the launcher to "skip" your grenade along the ground, slowing its travel speed and hopefully stopping it near enough to the opponent for the explosion radius to hurt your enemy. With this technique, even poorly-aimed shots become hazardous to the enemy; instead of flying off into the background, a grenade that "misses" can still do residual damage from the explosion and keep an enemy from moving in certain directions (like towards the Assault!).
Bombs and grenades make up the Assault's primary anti-bot tools. Each Black Jack will go down to 2-3 grenades, as will Gap Shots and Scramblers; Gremlins, Slims, and Buzzers all fall to one grenade, but are more effectively dealt with using the Assault Rifle. See Assault vs. Bots for more tips on destroying enemy bots.
The launcher's grapple attack is significantly weaker than a level 3 Charge grapple. It should only be used on enemy bots or when your Charge is unavailable.
The Grenade Launcher also does bountiful damage to an enemy Money Ball, so use this instead of the Assault Rifle.
Skills[]
Bomb[]
An Assault's Bomb is an excellent all-around tool. Use it to attack unaware foes, destroy Bots, defend a strong position, Ring Out Pros, and control space with the threat of its explosion. It is the Assault's most versatile weapon and can turn the tide in any engagement.
Use a Bomb to:
- Ring Out opponents by detonating it when the opponent is between the bomb and an Arena edge;
- Destroy groups of Bots (see Assault vs. Bots);
- Do strong damage to the Jackbot XL;
- Damage and light Pros on fire;
- Force opponents to keep their distance or risk being caught in an explosion;
- Block off Arena sections to hold a strong position;
- Trigger a Sniper's Traps.
Fly[]
See Flying above.
Charge[]
Charge is the key to surviving close-up encounters against most other classes. At level 1 and 2, Charge will push targets away from the player, giving the Assault room to maneuver and keeping dangers close-range fighters at bay. At level 3, Charge becomes a weapon of great importance, killing most Snipers and Assassins (lacking a Gold Armor Endorsement) with a grapple attack, and threatening to Ring Out or severely cripple most other players, although some players may choose not to use it because it leaves the assault vulnerable during the grapple, and it limits the damage to one enemy unless flying.
Charge makes an excellent escape move after an opponent grapples you but does not kill. Charge the opponent immediately after their grapple finishes to send them flying or, at level 3, potentially kill them with your own grapple. Unskilled Assassins will fall to this trick, but experienced foes will have discovered ways around it, including good timing on their Smoke Bomb; whether to use a Charge then becomes an important decision, and an Assault may need to wait a split second to see what the Assassin does after a grapple finishes. See Assault vs. Assassin and Assassin vs. Assault for more information.
Charge can be used in the air to greatly increase the Assault's maneuverability. See Flying above.
Endorsements[]
- See Assault Custom Classes for user-submitted Endorsement choices.
Juice[]
Like all classes, Assaults use Juice to mow through enemy Pros and do good damage to the opponent's Money Ball. In this regard, there are few Assault-specific strategies for using Juice. When Juiced, the Assault Rifle will tear through enemies at medium or close range, and the Grenade Launcher will destroy bots and -- more importantly -- turrets much faster than before. Although other classes are better at turret destruction, Assaults can still contribute to base attacks when Juiced by using the Grenade Launcher from afar; whereas an Assassin wrecking turrets will draw the attention of the entire enemy team, an Assault can quietly pick off turrets from far away with little to alert the enemy.
Arenas[]
AmmoMule Arena[]

Attack angles for players hiding in the side "rooms," particularly an Assault. From these positions, a Blue player can bombard all three turrets (red arrows) or the Money Ball (yellow) without exposing himself to much incoming fire.
The side "rooms" make excellent positions for bombarding the enemy's turrets and Money Ball. (Picture at right.) Grenades will make short work of turrets and do steady damage to the Money Ball while exposing an Assault to very little incoming fire, although you need to watch out for enemies using the room's "windows" or dropping down from the bridge above. This is especially effective given the small size of the Grenade Launcher rounds, making it hard for a team to determine the source of their Money Ball's damage. Use the Bomb defensively to lock down the clearest path into the room (straight in from the enemy's base), and maneuver around attacking players so that your Charge can send them off the arena.
Bombs can lock down entrances to the middle "round room," making it difficult to get to the Annihilator, Juice dispenser, or quickly access the other team's base. Fighting inside the room can be difficult, and although Charge performs better when the opponent has less room to maneuver, the skill also loses the chance for a Ring Out. Fighting inside the room also exposes an Assault to dangerous close-range weapons like the Support's Shotgun; the Assault Rifle's close-range power can't match the Shotgun's, but it will do much more damage than its usual medium-range performance.

Using the Grenade Launcher to bombard an enemy Sniper perched on Blue's bridge.
Snipers can be powerful players on AmmoMule, able to abuse the high ground on top of each base's bridges to hit your turrets, bot spawns, and harass players in the open or in the center round room. An Assault makes a good counter to Snipers who hide behind the glass at the ends of each bridge. Standing at the bottom of the ramp which leads to the round room, and peeking out around the corner to face the main engagement area, an Assault can launch grenades at the Sniper's hiding spot to kill him in 2 or 3 shots with the right angle (thanks to the ricochet of grenade rounds). The distance from the Assault's position to the Sniper's is just enough that grenades will detonate immediately after bouncing off the rear glass plate protecting the Sniper position, leaving the Sniper with few places to run and almost no time to react. In fact, most Snipers will retreat further behind the glass when your first grenade hits them -- expecting fire from other Snipers -- ironically leaving them even more vulnerable to your attack.
Two turrets on each side can be destroyed with the Grenade Launcher from atop your team's bridge areas. The bridges can also be used to attack enemy Bots as far away as the enemy's turret pair.
GrenADE III Arena[]
Ejector areas (colored arrows) and the Ejector panels (circles) that activate them. All panels are on the upper walkways.
Attempt to control the top walkways as much as possible! Assaults can be the first players on top of the walkways at the start of a match and should attempt to lock them down as quickly as they can. If unopposed, priorities should be to Bomb the enemy's entrance to the walkways in order to get easy damage and Ring Outs on players who are too slow to reach the top before the Assault. Charge will get many Ring Outs as well, although lucky opponents may land on the center "island" and live to fight on. Once the top is locked down, an Assault can pester bots with the Grenade Launcher and start working on destroying any enemy turrets. (All three base turrets on one side can be destroyed from on top of the walkways, though the closest turret to the walkway can be difficult to attack without exposing one's self to enemy fire.)
As the fastest "in the fight" class, Assaults should be making frequent use of the useful Ejectors scattered across the map. General strategies for the Arena apply here: watch for opponents attempting to use the Annihilator and Eject them first; take out threatening packs of Black Jacks with an Ejector; listen and watch for weakened opponents, or those near the arena's edge, and take them out with the Ejector. The more times you use the Ejector the fewer times the opponent can, so spend the $50 and make the most of the device. The "white" middle walkway becomes an important locus of control due to its access to two different Ejector areas.
Unlike other arenas, there are no "safe" areas here from which an Assault can bombard a downed Money Ball.
LaseRazor Arena[]


Assault strategy for the "tunnel" sections of LaseRazor Arena. As a member of the Hot Shots (Red), enter Ice Men (Blue)'s tunnel by following the red arrow. Place your bomb (blue dot) near the doorway entrance at the other end of the tunnel, and detonate it so the target flies in the direction of the yellow lines.
Assaults can be extremely deadly in the "tunnel" portions of this map. The left side of each base features a covered pathway with tight quarters and an open side that leads off the arena. Bombs and Charges help an Assault player hold these parts of the map very effectively. Unwitting opponents can be easily Ringed Out through explosions and Charges; placing a Bomb out of sight and waiting to trigger it will ensure that opponents won't be expecting an explosion and will most likely be sent off the map. Assassins won't have enough room to get around a waiting Assault, and any other class who wants to dislodge the Assault will have to be very careful with their timing and attempt to catch the defender in the middle of Bomb and Charge cool-downs. Keep an eye on players using the Jump Pad to go above you, as they will be able to jump down and come at your position from the back of the tunnel.
At the end of the tunnel is a grey pillar (which is really the back of the team's Jump Pad). There is a small space between this pillar and the far wall that can be fired through with either the Assault Rifle or the Grenade Launcher. Turrets will not return fire on this position, and most players don't know to look there, making it a good place to kill the far base turret or pick off stationary players. A highly visible Bomb may deter players from attacking the tunnel area, which can protect the Assault due to the very low visibility when using the pillar area.
The best counter to an Assault (or other players) abusing the tunnel is for a Support to hack the RockIt turret near the tunnel. A level 1 RockIt with level 1 Hack will be able to shoot players in the tunnel when it previously could not. The tunnel players will be unable to do appreciable damage to a base defended in such a way unless they make a major push from that side.
Steel Peel Arena[]


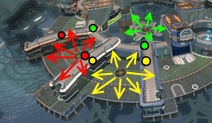
Monitoring enemy approaches on Steel Peel Arena. From the upper level of the round room, watch (green arrows) for enemies and respond accordingly. Move down the curved path (red arrow) when it is clear and place a Bomb (blue dot) to lock down the side base exit.
Map control on Steel Peel largely revolves around the upper levels, and the Assault is a key component in keeping control of the top once a team has it. The quickest way to reach the upper levels is from the Jump Pad in each team's base, and any opponent attempting to access the top through this route should have a Bomb waiting for them courtesy of an observant Assault. This access point can be further locked down with Sniper Traps and Support Firebases, granting a team tremendous positional advantage once fully set up. Bombs can be thrown from the upper level into the enemy's base to attack turrets, bot spawns, or harass players on their base's upper catwalk, preventing them from even accessing their Jump Pad; make sure the top is fully secure before doing this, as a Bomb is much more useful defensively in this position.
The round room that connects to the enemy base is an excellent observation point. From the upper level, an Assault can monitor the enemy's base and watch for opponents who attempt to use the upper Jump Pad to reach the top level, or who exit their base from the side and attempt to gain top access through the round room. (See picture at right.) Using his mobility, an Assault can respond to either threat and counter the enemy push with a Bomb and Assault Rifle attack. A single level 3 Bomb locks down the entire side path (the red arrow in the picture), and can lead to greater map control by pushing up the path once enemies have backed off. A Bomb explosion here has a good chance of Ringing Out an opponent -- as will a Charge attack -- making the Assault a deadly combatant in the area.
The Grenade Launcher can be bounced off the glass walls which border the upper level of the main engagement area. Utilizing the ricochet while staying behind cover gives the Assault a great advantage when engaging other classes at long range on this arena. Grenades can also be bounced off the very short "curb" on the edge of the side paths that connect to each base (red arrow in the picture); the ricochet is not as great as being bounced off a glass window or wall, but it is enough when combined with the grenade's small explosion radius to damage enemies hiding around the corner.
| ||||||||||||||